To run an OpenCV application on a target:
-
Create Linux images enabling the Open CV and C++ libraries.
-
Create a PetaLinux project.
source /proj/petalinux/petalinux-v2016.3_daily_latest/petalinux-v2016.3-final/settings.csh
petalinux-create -t project -s /proj/petalinux/petalinux-v2016.3_bsps_latest/Xilinx-ZCU102-v2016.3-final.bsp
-
Use
petallinux-config -c rootfs to enable Open CV and C++
libraries.
-
Select all libraries at .
-
Select all libstdc++ libraries at .
-
To debug from Xilinx SDK, enable tcf-agent at . Alternatively, you can run the agent independently after boot.
-
Save the kernel configuration and use
petalinux-build to build the
project.
-
Use the image to boot Linux in any of the convenient boot mode.
-
After a successful boot, obtain the board IP address.
If you see an error while booting, change the CONFIG_SYS_BOOTM_LEN
parameter in the u-boot config file according to the size of the image For example, add
#define CONFIG_SYS_BOOTM_LEN 0x<imagesize> in the
$PTLNX_PROJECT/subsystems/linux/configs/u-boot/platform-top.h file.
Build the PetaLinux project again and try booting with the new image.
-
Select Linux TCF Agent from the Target Connections view.
-
Double-click Linux Agent.
The Target Connection Details dialog box appears.
-
Specify the board IP address, obtained during the boot, in the Target Connection Details dialog box.
-
Create a new folder /tmp/opencv_lib in the Linux file system.
-
Copy the Opencv libraries to the newly created /tmp/opencv_lib folder in remote file system.
Note: The OpenCV libraries are located in the \<install_location>\SDK\<version>\data\embeddedsw\ThirdParty\opencv folder of your SDK installation. Where <install-location> is the SDK installation file path and <version> is the current version of the SDK.
-
Create a Linux OpenCV application. For more details, refer Creating an OpenCV Template Application.
-
Build the application.
-
Select .
The Debug Configurations dialog box appears.
-
Click on Xilinx C/C++ application (System debugger) to create a new debug configuration.
-
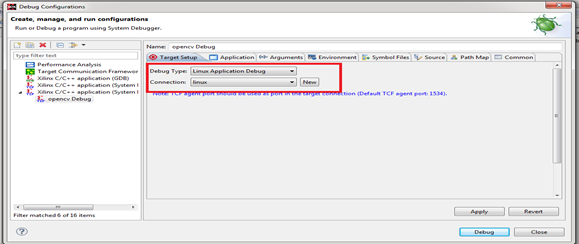
On the Target Setup tab page, select Linux Application Debug from the Debug Type list.
-
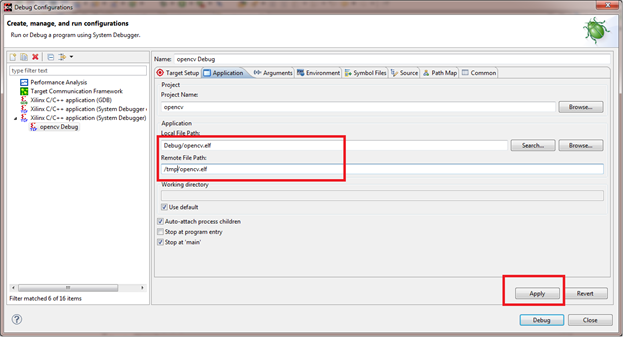
On the Application tab page, specify the local .elf file path and the remote .elf file path.
Note: The remote .elf file path is /tmp/opencv.elf.
-
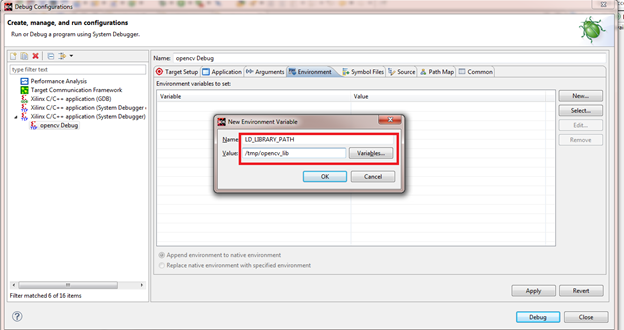
On the Environment tab page, click on the New button.
The New Environment Variable dialog box appears.
-
Set /tmp/opencv_lib file path to the OpenCV libraries in the LD_LIBRARY_PATH environment variable .
-
Click OK to create the environment variable and close the New Environment Variable dialog box.
-
Click Debug.
You will be able to debug the OpenCV application using the system debugger.